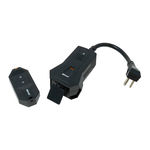
the center and a hanging hole at the base of the power cord to ensure stable placement.
PAIRING THE REMOTE AND RECEIVER
1. Plug the receiver into the socket. When the receiver indicator light begins to flash, it
is ready to be paired. If the receiver indicator light is not flashing, hold down the power
button until it begins to flash.
2. Press any button on the remote transmitter to pair with the receiver. Pairing is
successful when the receiver indicator light stops flashing.
3. To pair additional receivers, simply repeat the instructions above.
TROUBLESHOOTING
• If the receiver indicator light continues to flash for more than 10 seconds, then pairing
was unsuccessful. Unplug the receiver unit from the socket and repeat the steps above.
• When using this product for the first time, do not plug-in two or more receivers at the
same time to avoid potential interference.
• Place the receiver in an area that can detect natural sunlight. Ensure the photocell is
not blocked or covered which can interfere with the photocell's efficiency. The photocell
will trigger ON at dusk when under 8-45 Lux and trigger OFF when above 8-45 Lux.
UNPAIRING THE REMOTE AND RECEIVER
1. Press and hold the power button on the receiver for 3 seconds until the receiver
indicator light begins to flash, then short press the power button.
2. The receiver indicator light will stop flashing indicating that the remote and receiver
have been unpaired. To pair a new remote and receiver, repeat instructions above.
SPECIFICATIONS
Rating: 125VAC 60HZ
15A / 1875W Resistive 10A / 1250W Tungsten 1/2Hp
433.92MHz DC3V
Receiver operating temperature:-20 - 45°C
Remote Transmitter operating temperature: 0-40°C
IMPORTANT! Contains (1) 3V CR2032 battery. Batteries must be recycled or disposed of
properly. Keep batteries out of the reach of children.
WARNING: RISK OF ELECTRIC SHOCK
Suitable for use with outdoor appliances. Raintight went mounted vertically with the
receptacle facing downward. Use a three conductor GFCI protected outlet. Not for water
immersion. Store indoor when not in use.
• Plug directly into an electrical outlet.
• Unplug timer before cleaning.
• Keep children away.
• Do not exceed electrical ratings.
• Do not use with extension cords.
CAUTION: DO NOT PLUG IN MORE THAN THE RATED LOAD (SEE RATINGS.)
Find the total watts being used. If watts are not market on the appliance, multiply
ampere rating (on nameplate) by 125 volts to determine equivalent watts. For lamps with
multiple bulbs, add the wattage on the bulbs
This product is guaranteed to be free of defects in materials and workmanship for 1 year
from the date of purchase. If this product is defective, call 1-800-561-4321 for repair
or replacement parts or return the product to the store from which it was purchased.
Guarantee does not include normal wear and tear.
UNITED STATES AND CANADA
Users of this product are cautioned not to make modifications or changes that are not
approved by Southwire Co, doing so may void the compliance of this product and may
result in the loss of the user's authority to operate the equipment.
FCC DIGITAL EMISSIONS COMPLIANCE
This device complies with part 15 of the FCC Rules. Operation is subject to the following
two (2) conditions: (1) This device may not cause harmful interference and (2) this device
must accept any interference received including interference that may cause undesired
operation. This equipment has been tested and found to comply with the limits for a
Class B digital device, pursuant to Part 15 of the FCC Rules. These limits are designed
to provide reasonable protection against harmful interference in a residential installation.
This equipment generates uses and can radiate radio frequency energy and, if not
installed and used in accordance with the instructions, may cause harmful interference
to radio communications. However, there is no guarantee that interference will not occur
in a particular installation. If this equipment does cause harmful interference to radio
or television reception, which can be determined by turning the equipment off and on,
the user is encouraged to try to correct the interference by one or more of the following
TEMPLATE/GABARIT/PLANTILLA
1812_50125 & 50125-R_InstrMan.indd 1
• Reorient or relocate the radio or television receiving antenna.
• Increase the separation between the computer equipment and receiver.
• Connect the equipment into an outlet on a circuit different from that to which the
radio or television receiver is connected.
• Consult the dealer or an experienced radio television technician for help.
Canadian Digital Apparatus Compliance
CAN ICES-003(B)/NMB-003(B)
Customer Support: (800) 561-4321
www.southwire.com
Télécommande Sans Fil, 1 Prise Mise à la Terre
Modèle 50125, 50125-R | Article 50125WD
• La télécommande peut transmettre des signaux jusqu'à 100 pieds.
• Un récepteur peut être jumelé à un maximum de cinq émetteurs distants.
• Un seul émetteur distant peut commander un ou plusieurs récepteurs
• Le récepteur est doté d'un bouton MARCHE/ARRÊT manuel pour
neutraliser la télécommande.
INSTALLATION
Cette minuterie enfichable est conçue pour être suspendue verticalement, la prise vers
le bas seulement. Il y a deux entrées d'installation à l'arrière du dispositif, y compris une
entrée fixe au centre et une entrée de suspension à la base du cordon d'alimentation
pour assurer un placement stable.
JUMELAGE DE LA TÉLÉCOMMANDE ET DU RÉCEPTEUR
1. Branchez le récepteur sur la prise de courant. Lorsque le voyant lumineux du
récepteur commence à clignoter, il est prêt à être jumelé. Si le voyant lumineux du
récepteur ne clignote pas, maintenez le bouton MARCHE/ARRÊT enfoncé jusqu'à ce
qu'il commence à clignoter.
2. Appuyez sur n'importe quelle touche de l'émetteur portatif pour le jumeler avec le
récepteur. Le jumelage est réussi lorsque le voyant lumineux du récepteur cesse de
3. Pour jumeler d'autres récepteurs, répétez simplement les instructions ci-dessus.
• Si le voyant lumineux du récepteur continue de clignoter pendant plus de 10 secondes,
le jumelage a échoué. Débranchez le récepteur de la prise et répétez les étapes
• Lors de la première utilisation de ce dispositif, ne branchez pas deux récepteurs ou
plus en même temps pour éviter toute interférence potentielle.
• Placez le récepteur dans un endroit qui peut détecter la lumière naturelle du soleil.
S'assurer que la photocellule n'est pas bloquée ou recouverte, ce qui pourrait nuire à
son efficacité. La photocellule se déclenche le soir lorsque la luminosité est inférieure à
8-45 Lux et s'éteint lorsque la luminosité est supérieure à 8-45 Lux.
DÉBRANCHEMENT DE LA TÉLÉCOMMANDE ET DU RÉCEPTEUR
1. Appuyez sur le bouton marche/arrêt du récepteur et le maintenir enfoncé pendant
trois secondes jusqu'à ce que le voyant lumineux du récepteur commence à clignoter,
puis appuyer brièvement sur le bouton marche/arrêt.
2. Le voyant lumineux du récepteur cesse de clignoter pour indiquer que la
télécommande et le récepteur ont été dépairés. Pour jumeler une nouvelle
télécommande et un nouveau récepteur, répétez les instructions ci-dessus
SPECIFICATIONS
125Vac 60Hz, 15A / 1875W Résistive, 10A / 1250W Tungstène, 1/2Hp
433.92MHz DC3V
Température de fonctionnement du récepteur : -20 - 45°C
Température de fonctionnement du transmetteur à distance : 0 - 40°C
IMPORTANT! Comprend une pile (1) 3V CR2032. Les piles doivent être recyclées ou
mises au rebut de façon appropriée. Conservez les piles hors de la portée des enfants.
AVERTISSEMENT : RISQUE DE CHOC ÉLECTRIQUE
Convient pour toute utilisation avec des appareils d'extérieur. Montage vertical étanche à
la pluie avec le réceptacle orienté vers le bas. Utiliser une prise de courant protégée par
un disjoncteur de fuite de terre à trois conducteurs. Ne pas utiliser en immersion dans
• Entreposer à l'intérieur lorsqu'il n'est pas utilisé.
• Branchez directement dans une prise électrique.
• Tenir loin des enfants.
• Ne pas dépasser les caractéristiques électriques nominales.
• Ne pas utiliser avec des rallonges électriques.
MISE EN GARDE : NE PAS BRANCHER UNE CHARGE SUPÉRIEURE À LA CHARGE
NOMINALE (VOIR LES VALEURS NOMINALES).
Trouvez le nombre total de watts utilisés. Si les puissances ne sont pas afichées sur
l'appareil, multipliez l'intensité nominale (indiquée sur la plaque signalétique) par
125 volts pour déterminer les puissances équivalentes. Pour les lampes à ampoules
multiples, ajoutez la puissance sur les ampoules.
2.30in/5.84cm
6/12/19 11:14 AM
Wireless remote control dual outlets (4 pages)